twitter
    Find out what I'm doing, Follow Me :)
Showing posts with label jsp. Show all posts

Use Jetty to run Maven web applications in NetBeans

Jetty is a great web server. It is fast to start up and that makes it very useful during development. Jetty has a Maven plugin we can use in our Maven web application project. This way we can use Jetty to test our JSP files. We can change the JSP file and hit the Refresh button of our browser to see the result immediately. We can even compile a Java class file and Jetty will restart so we can test the result in our browser.
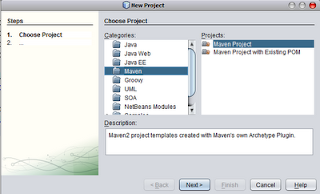
Let's see how we can do this in NetBeans. We go to File | New Project, select Maven Project and click the Next button.
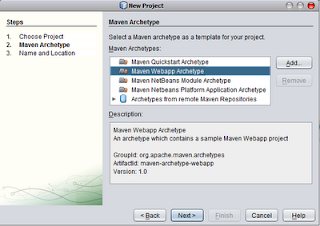
In the next dialog window we select Maven Webapp Archetype and click the Next button.
Now we can fill in the values for our project and press the Finish button.
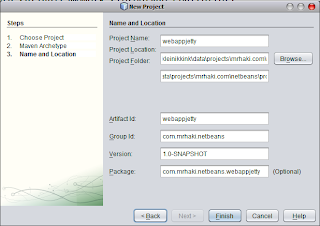
NetBeans creates a new project for us. To add Jetty Maven plugin we must open the pom.xml file for our project. In the build section we must add the following code:


org.mortbay.jetty
maven-jetty-plugin
6.1.14

5

At line 6 we define how often Jetty will scan the source directories to look for changes. Because we add this definition we can change JSP files and see the result in our web browser without restarting the server.
Okay, we have defined Jetty for our project, but how can we run Jetty in NetBeans? We go to File | Project Properties and select the Actions category. We must look for the action Run project and select it. In the Execute goals field we add jetty:run. This will start Jetty if we run our project. We can close the dialog window.
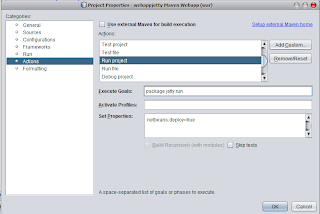
Now we go to Run | Run Project to start Jetty. In the Output window of NetBeans we see the following text:
Starting jetty 6.1.14 ...
2009-02-11 10:20:20.610::INFO: jetty-6.1.14
2009-02-11 10:20:20.982::INFO: No Transaction manager found - if your webapp requires one, please configure one.
2009-02-11 10:20:21.335::INFO: Started SelectChannelConnector@0.0.0.0:8080
Started Jetty Server
Starting scanner at interval of 5 seconds.
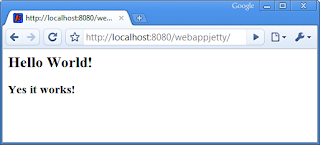
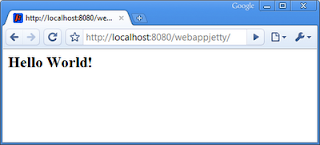
At line 3 we see Started SelectChannelConnector@0.0.0.0:8080 this means Jetty is available at port 8080. We open a web browser and open http://localhost:8080/webappjetty/ and we see the following:
We go back to NetBeans and open the file index.jsp. We add the following to the file:

It works!

We switch back to our web browser and reload the page and we get:

Install Tomcat 6 on Ubuntu


If you are running Ubuntu and want to use the Tomcat servlet container, you should not use the version from the repositories as it just doesn’t work correctly. Instead you’ll need to use the manual installation process that I’m outlining here.

Before you install Tomcat you’ll want to make sure that you’ve installed Java. I would assume if you are trying to install Tomcat you’ve already installed java, but if you aren’t sure you can check with the dpkg command like so:


dpkg –get-selections | grep sun-java

This should give you this output if you already installed java:


sun-java6-bin install
sun-java6-jdk install
sun-java6-jre install

If that command has no results, you’ll want to install the latest version with this command:


sudo apt-get install sun-java6-jdk

Installation

Read my post for last JDK http://diegobenna.blogspot.com/2011/01/install-jdk-6-update-21-in-ubuntu-1010.html or follow:


sun-java6-bin install
sun-java6-jdk install
sun-java6-jre install

Now we’ll download and extract Tomcat from the apache site. You should check to make sure there’s not another version and adjust accordingly.


wget http://apache.hoxt.com/tomcat/tomcat-6/v6.0.14/bin/apache-tomcat-6.0.14.tar.gz
tar xvzf apache-tomcat-6.0.14.tar.gz

The best thing to do is move the tomcat folder to a permanent location. I chose /usr/local/tomcat, but you could move it somewhere else if you wanted to.


sudo mv apache-tomcat-6.0.14 /usr/local/tomcat

Tomcat requires setting the JAVA_HOME variable. The best way to do this is to set it in your .bashrc file. You could also edit your startup.sh file if you so chose.

The better method is editing your .bashrc file and adding the bolded line there. You’ll have to logout of the shell for the change to take effect.


vi ~/.bashrc

Add the following line:


export JAVA_HOME=/usr/lib/jvm/java-6-sun

At this point you can start tomcat by just executing the startup.sh script in the tomcat/bin folder.

Automatic Starting

To make tomcat automatically start when we boot up the computer, you can add a script to make it auto-start and shutdown.


sudo vi /etc/init.d/tomcat

Now paste in the following:


# Tomcat auto-start
#
# description: Auto-starts tomcat
# processname: tomcat
# pidfile: /var/run/tomcat.pid

export JAVA_HOME=/usr/lib/jvm/java-6-sun

case $1 in
start)
sh /usr/local/tomcat/bin/startup.sh
;;
stop)
sh /usr/local/tomcat/bin/shutdown.sh
;;
restart)
sh /usr/local/tomcat/bin/shutdown.sh
sh /usr/local/tomcat/bin/startup.sh
;;
esac
exit 0

You’ll need to make the script executable by running the chmod command:


sudo chmod 755 /etc/init.d/tomcat

The last step is actually linking this script to the startup folders with a symbolic link. Execute these two commands and we should be on our way.


sudo ln -s /etc/init.d/tomcat /etc/rc1.d/K99tomcat
sudo ln -s /etc/init.d/tomcat /etc/rc2.d/S99tomcat

Tomcat should now be fully installed and operational. Enjoy!


sudo /etc/init.d/tomcat restart

Polifemo


Polifemo is my new project. This is a software that integrates dynamic data, including data about products and services directly from the shared database and management of those with an economic activity. These data are integrated into a geographic map.

Try the JNLP now http://polifemo.googlecode.com/files/prototypeFX.jnlp

The idea then is to create value-added data that until now were only used for personal purposes. Sharing and integration would therefore benefit not only users but also those who decide to share their data. The next goals are to integrate the products and services and implement the search functions, optimizing the connectors so as to minimize the calls to the servers that share data, create a more usable client, view the bus routes and means of transport.

Find all information in project blog http://blogpolifemo.blogspot.com/.